
Convert your running, customised Raspberry Pi OS back to an image that others may use, or create a Raspberry Pi image from scratch.

Fortunately, there are at least two options for doing this work.
- Adapt the source code for the Raspberry Pi OS image-building toolchain pi-gen, which allows you to create a Raspberry Pi image from the ground up.
- Return your customised Raspberry Pi OS to an image that others can use.
Both approaches are covered in this article. I'll go over the advantages and disadvantages of each strategy.
Pi-gen
Let's get started with pi-gen. Before we get started, there are a few things you should know.
Prerequisites
It is suggested that you use a 32bit version of Debian Buster or Ubuntu Xenial to complete the construction procedure. It may work on other systems as well, but I recommend creating a virtual machine using one of the listed systems to prevent extra problems. Take a look at my post Try Linux on Any Operating System with VirtualBox if you're not familiar with virtual machines. Install the requirements listed in the repository description after everything is up and running. You'll also need internet connectivity and adequate free storage space in the virtual computer. My virtual computer was set up with a 40GB hard disc, which appeared to be sufficient.
Make a clone of the pi-gen repository or fork it if you wish to start building your own image to follow the steps in this article.
Overview of the Repository
The entire construction process is broken down into stages. Each stage is represented as a regular folder and serves as a logical step between a complete Raspberry Pi OS image and a full Raspberry Pi OS image.
Stage 0: Bootstrap—Establishes a functional filesystem.
Stage 1: Minimal system—Creates the most basic system possible.
Stage 2: Lite system—This corresponds to the Raspberry Pi OS Lite version.
Stage 3: Desktop environment—Installs X11, LXDE, web browsers, and other applications.
Stage 4: This corresponds to a standard Raspberry Pi operating system.
Stage 5 corresponds to the whole Raspberry Pi OS.
The stages are interconnected: you can't create a higher stage without first completing the lower ones. You also can't skip a stage in the middle. To construct a Raspberry Pi OS Lite, for example, you must complete steps 0, 1, and 2. Stages 0, 1, 2, 3, 4, and 5 are required to construct a Raspberry Pi OS with a desktop.
Process of construction
Build.sh, which can be located in the root repository, manages the build process. It won't be difficult to grasp the method outlined there if you already know how to read and write bash scripts. If not, reading the build.sh and attempting to figure out what's going on is a good habit to get into. You can construct your own image with Cockpit preinstalled even if you don't know how to use bash scripting.
The construction process is made up of multiple nested for-loops in general.
stage-loop: Iterate over all of the stage directories in ascending order.
- If a file called SKIP is discovered, skip the rest of the procedure.
- Run the prerun.sh script.
- sub-loop: If the following files are present, loop over each subfolder in ascending order and process them:
- 00-run-sh: Run arbitrary commands ahead of time
- 00-run-chroot.sh: Run this script in the image's chroot directory.
- 00-debconfs: Debian's debconf-set-selection variables
- 00-packages: 00-packages-nr: a list of packages to install Similar to 00-packages, except this will cause apt-get to install with the —no-install-recommends -y option.
- 00-patches: A directory containing quilt patch files to be applied.
- If a file named EXPORT IMAGE is discovered in the stage-loop, produce an image for this stage.
- If a file named SKIP IMAGE is discovered, the image will not be created.
A file entitled config is also required by build.sh, which is read at startup and contains certain specifications.
We'll start by making a basic Raspberry Pi OS Lite image. Our custom image will be based on the Raspberry Pi OS Lite image. Add the following two lines to an empty file called config:
IMG_NAME='Cockpit'
ENABLE_SSH=1
In the stage3, stage4, and stage5 folders, create an empty file named SKIP. Stages 4 and 5 emit an image by default, therefore in stage 4 and stage 5, add an empty file named SKIP IMAGE.
Now, open a terminal and type su to switch to the root user. Start the build script by going to the repository's root directory and typing./build.sh.
Following the completion of the build process, you will notice two additional folders in the root of the repository: work and deploy. Some interim output can be found in the work folder. The packed image file, suitable for deployment, should be found in the deploy folder.
We can now tweak the procedure such that it also instals Cockpit if the whole build process was successful.
Increasing the duration of the construction process
The Raspberry Pi OS Lite image serves as the foundation for our Cockpit setup. We'll make our own stage3 to handle the Cockpit installation because the Raspberry Pi OS Lite image already has stage2.
We entirely delete the previous stage3 and replace it with a new, empty stage3:
rm -rf stage3 && mkdir stage3We construct a substage for adding the cockpit within stage 3:
mkdir stage3/00-cockpitWe just need to add cockpit to the package list to install it on the image:
echo "cockpit" >> stage3/00-cockpit/00-packagesWe also want our new stage3 to produce a picture, so we simply place the following file in the stage3 directory:
touch stage3/EXPORT_IMAGEWe may avoid the stages being created again by placing skip-files in the appropriate directories: Skip the build process for stage0 and stage1:
touch stage0/SKIP && touch stage1/SKIPFor stage 2, skip the construction procedure as well as the image creation:
touch stage2/SKIP && touch stage2/SKIP_IMAGERun the build script one more:
./build.shYou should now see a compressed image named -Cockpit-lite.zip in the deployment folder, which is ready to deploy.
Troubleshooting
Building your own Raspberry Pi image with pi-gen requires a lot of trial and error if you want to make more sophisticated changes. The construction process will almost probably come to a halt in the middle for whatever reason. We have to conduct some cleaning manually in case the build process stops because there is no exception handling in the construction process.
The chroot file system is most likely still mounted after the process has terminated. You won't be able to start a fresh build without first unmounting the previous one. If it is still mounted, manually unmount it by typing:
umount work/<Build-date-&-image-name>/tmpimage/The script also came to a halt when the chroot filesystem was going to be unmounted, which I discovered. You can see this in the file scripts/qcow2 handling, right before the attempt to unmount sync is made. Sync causes the system's write buffer to be flushed. Because the writing process was not ready when unmount was called while running the build system as a virtual machine, the script came to a halt here.
To fix this, I just added a nap between sync and unmount, which fixed the problem:

(I realise that 30 seconds is excessive, but considering that the entire build process takes more than 20 minutes, 30 seconds is a drop in the bucket.)

Make changes to an existing image
Rather than creating an image using pi-gen, the modification may be applied straight to a current Raspberry Pi OS. Simply log in and run the following command to install Cockpit in our scenario:
sudo apt install cockpitNow turn off your Raspberry Pi, remove the SD card, and plug it into your computer. Type lsblk -p: to see if your system has automatically mounted the partitions on the SD card.
The SD card is represented by the device /dev/sdc in the picture above, and the boot and rootfs partitions were mounted automatically at the indicated mount points. Before you go any further, unmount them with:
umount /dev/sdc1 && umount /dev/sdc2The contents of the SD card are now copied to our file system. As the image will be the same size as the SD card, make sure you have adequate storage space. Use the following command to begin the copying process:
dd if=/dev/sdc of=~/MyImage.img bs=32M
wget https://raw.githubusercontent.com/Drewsif/PiShrink/master/pishrink.sh
chmod +x pishrink.sh
sudo mv pishrink.sh /usr/local/bin
Now type the following to start the script:
sudo pishrink.sh ~/MyImage.img
PiShrink shrank the picture by nearly a factor of 10, shrinking it from 30GB to 3.5GB. You may still make it smaller by compressing it before uploading or sharing it.
That's all there is to it; you may now share and flash this image.
The picture is flashing.
Follow the instructions below to flash your own custom Raspberry Pi image back to the SD card using Linux.
Insert the SD card into your computer. If you have a prior installation, your machine will most likely mount the filesystem on the SD card automatically. You may check this by running lsblk -p: in a command prompt.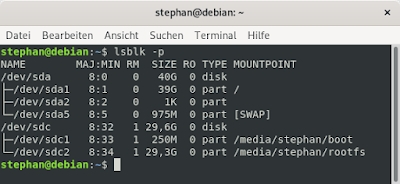

Because this SD card already included a Raspberry Pi OS, my system immediately mounted two filesystems, boot and rootfs, as shown in the picture above. To begin flashing the SD card, we must first unmount the file systems by typing:
umount /dev/sdc1 && umount /dev/sdc2To continue, the output of lsblk -p should look like this:

You may now write the image to the SD card: To get started, open a command prompt and type:
dd if=/path/to/image.img of=/dev/sdc bs=32M, conv=fsyncYou specify that the SD card be written in 32-megabyte blocks with bs=32M, and conv=fsync requires the process to physically write each block with conv=fsync.
If everything went well, you should see something like this:

Done! You may now boot the Raspberry Pi with the SD card in place.
Both of the approaches discussed in this article have benefits and drawbacks. Although using pi-gen to build your own unique Raspberry Pi images is more error-prone than just editing an existing image, it is the preferred approach for setting up a CICD pipeline. My personal preference is plainly modifying an existing image since you can immediately see if the adjustments you made are working.
Posts You May like:
- How to Send phone notifications Using Raspberry Pi Pico?
- Raspberry Pi Pico 4G/2G Expansion : Expectations vs. Reality
- Quick Example to Drive Servo Using Programmable I/O
- How to Use a USB SSD or Flash Drive to Boot a Raspberry Pi 4 / Pi 400
- Filter Ads by your Raspberry Pi Before they Reach your Devices
- A Raspberry Pi 4 Model A Launch 2022 - Eben Upton
- First-Ever 2G Expansion Board for Raspberry Pi Pico has Launched on Kickstarter
- Learn IoT "Internet of Things" with 24 lessons for Teachers and Students
- Quick Guide for Raspberry Pi Users: Raspberry Pi Terminal Commands
- Windows 11 on Raspberry Pi Devices in Easy Installation Guide
- Get Your Project Done by Raspberry Pi Approved Design Partners
- PiRelay 8 Smart Relay Board for Raspberry Pi - Kickstarter
- Tiny Round/Circular LCD Display Launched!
- Issue Fixed! USB Boot Ubuntu Server 20.04 on Raspberry Pi 4
- HC-SR04 Sensor with micro-ROS on the Raspberry Pi Pico
- Raspberry Pi Pico: ADC Sampling and FFT
- Using CircuitPython for RP2040
- How to Setup Pico RP2040 on Windows
- Using micro-ROS on the Raspberry Pi Pico
- LED Tricks Using The Raspberry Pi Pico
- The RP2040 Raspberry Pi Pico Meets LoRa
- Pico supports SD cards and FatFS
- How to connect a Raspberry Pi Pico to LoRaWAN
- 50 Raspberry Pi Hacks & Tips You Should Know
- How to Install Wi-Fi and Internet on a Raspberry Pi Pico


