
You don't have access to a computer and need to make a micro SD card for your Raspberry Pi. With this ingenious Android software, you won't have any problems.
The first step in setting up a Raspberry Pi is to write an SD card, which requires a computer, a card reader, and software like Raspberry Pi Imager. But what if you're not near a computer and need to create a fresh operating system for your Raspberry Pi? Fortunately, for Android phones and tablets, there is a really helpful software.
Mike Redrobe's Raspi SD Card Imager is an utility for creating operating system images for the Raspberry Pi. It can download and flash a variety of images, including Raspberry Pi OS, Ubuntu, and RetroPie, from a single app.
You may write your own unique pictures to an SD card while on the road if you have them. Let's look at how to write the newest Raspberry Pi OS 32-bit on a microSD card for a spare Raspberry Pi 4.
What You Will Require
- Android-based gadget
- Adapters that allow you to connect a micro SD card reader to your computer
- Micro SD memory card
- Raspberry Pi and its extras
How to Use the Raspi SD Card Imager to Install the Raspberry Pi OS
1. Open the Google Play Store on your Android device and search for Pi SD Card Imager.
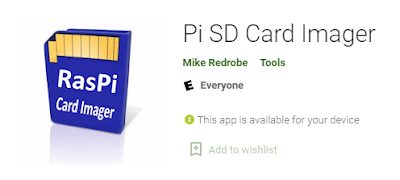 |
| Pi SD Card Imager |
2. Place your micro SD card (along with the reader) in your Android device. Use the built-in micro SD card reader if your device has one.
3. Press the three dots in the upper right corner of the screen to open the Raspi SD Card Imager programme. Choose Choose OS and then select Pi 4 using the filters at the top of the screen.
4. Select Raspberry Pi OS (32-bit) from the drop-down menu (3.2GB). The installation files will be downloaded and cached to your Android smartphone.
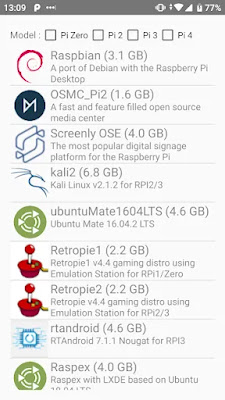 |
| Choose OS and then select Pi 4 |
5. From the three-dot menu, choose SD or USB. Choose the drive where your micro SD card is stored.
6. To enable out-of-the-box SSH functionality, click "Enable SSH for remote login."
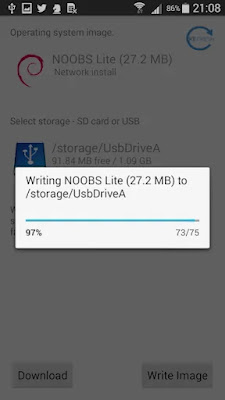
7. To begin the procedure, click "Write to SD." This should take no more than 10 minutes, depending on the Android device.
8. Remove the micro SD card from the Raspberry Pi and replace it with the micro SD card.
9. Turn on the Raspberry Pi, and it will complete the last phases of the installation. The Pi will reboot after that, and you will see the Raspberry Pi OS Desktop.
Posts You May like:
- Release Date & New Features for Ubuntu 21.10
- Pico Sense HAT - Raspberry Pi Environment Monitoring Add-on Pico
- Pop OS Linux is Coming to Raspberry Pi and Other ARM Devices Soon
- How to Immediately Upgrade to Windows 11
- A Secret Update for the Raspberry Pi 4 8GB
- Raspberry Pi Introduces a New Documentation Hub
- Quick start with ESP8266 based Pico WiFi HAT
- Capture local Real-Time Air Quality Data with Raspberry Pi Pico
- GitHub CLI 2.0 Is Now Available, With Extension Support
- Connecting Wi-Fi on Raspberry Pi Pico Become Easy
- How To Track All Devices with Raspberry Pi
- Make your own Raspberry Pi Image from scratch
- How to Send phone notifications Using Raspberry Pi Pico?
- Raspberry Pi Pico 4G/2G Expansion : Expectations vs. Reality
- Quick Example to Drive Servo Using Programmable I/O
- How to Use a USB SSD or Flash Drive to Boot a Raspberry Pi 4 / Pi 400
- Filter Ads by your Raspberry Pi Before they Reach your Devices
- A Raspberry Pi 4 Model A Launch 2022 - Eben Upton
- First-Ever 2G Expansion Board for Raspberry Pi Pico has Launched on Kickstarter
- Learn IoT "Internet of Things" with 24 lessons for Teachers and Students
- Quick Guide for Raspberry Pi Users: Raspberry Pi Terminal Commands
- Windows 11 on Raspberry Pi Devices in Easy Installation Guide
- Get Your Project Done by Raspberry Pi Approved Design Partners
- PiRelay 8 Smart Relay Board for Raspberry Pi - Kickstarter
- Tiny Round/Circular LCD Display Launched!
- Issue Fixed! USB Boot Ubuntu Server 20.04 on Raspberry Pi 4
- HC-SR04 Sensor with micro-ROS on the Raspberry Pi Pico
- Raspberry Pi Pico: ADC Sampling and FFT
- Using CircuitPython for RP2040
- How to Setup Pico RP2040 on Windows
- Using micro-ROS on the Raspberry Pi Pico
- LED Tricks Using The Raspberry Pi Pico
- The RP2040 Raspberry Pi Pico Meets LoRa
- Pico supports SD cards and FatFS
- How to connect a Raspberry Pi Pico to LoRaWAN
- 50 Raspberry Pi Hacks & Tips You Should Know
- How to Install Wi-Fi and Internet on a Raspberry Pi Pico


